Please click here for visiting the quick start guide in German
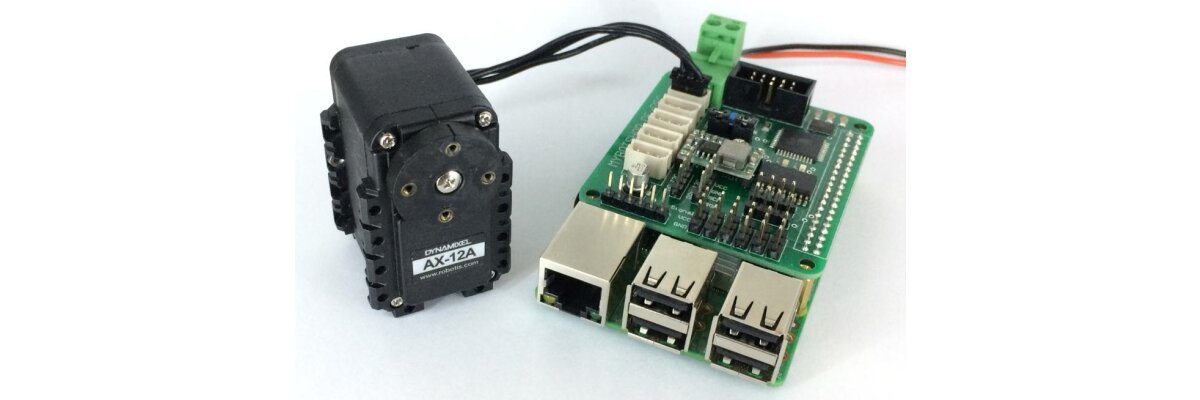
The Dynamixel Servo Controllerboard (DSC) is a high performance and arduino compatible Raspberry Pi expansion board to control the following ROBOTIS Dynamixel Servo Motors:
- AX / MX / X Series
- Half Duplex UART Interface
Following aspects were very important for us concerning the development!
We've decided to develop our own Dynamixel Servo Controllerboard because ROS.org (Willow Garage) featured the Raspberry Pi as good Development Board, but no manufacturer provides a controllerboard which can be easily pluged on the RPi.
Some controllerboards can be used with a Raspberry Pi but you need a logic converter and up to three voltages to supply the RPi, controllerboard and the servomotors.
With our Dynamixel Servo Controllerboard you can control up to 254 Dynamixel Servomotors from different Series with a half duplex UART protocoll, and it is very easy to use. You have to plug it only on the GPIO Header and the integrated step down module supplies the DSC and RPi. We recomment a 3S Lipo.
Range of functions
- Controlling ROBOTIS DYNAMIXEL Servomotors ( AX / MX / X Serie )
- Read datas from the motor ( Temperature, Position & Voltage )
- RPi GPIO
- uC Digital & Analog Ports
- uC & RPi I2C
- Controlling 6 x PWM Servos
With a additional FTDI Converter you can use the DSC also with a USB, or as stand alone, device. You can add a great working FTDI Convereter during order process.
Usage with Arduino IDE
Driver Installation
We recommend the usage of a original USBasp Programmer, which can be also ordered in our shop. This small device has a USB interface, is arduino compatible and easy to use. If you are using a Windows OS you need the tool Zadig to install the driver. If you are using a Linux or Mac OS you can skip this step.
Add MYBOTSHOP DSC to the Arduino IDE
We are providing the bootloader, libraries and examples, for the DSC, which can be download HERE. After unzip you will find two folders called libraries and hardware which need to paste in C:/Documents/Arduino.
Upload the Code
Because we are using a USBasp Programmer the upload function is a little bit different to other Arduino development boards. After chosing the MYBOTSHOP DSC as Board and USBasp as Programmer you can go to Sketch and press Upload with programmer.
Software
For reading datas and controlling the Dynamixel Servomotors we are using DynamixelSerial1 Library from Savage Electronics. This lib is very easy to implement and use. For more informations about downloading and adding them, please read the part above.
Reading Position, Temperature and Voltage
The Dynamixel Servomotors have a integrated encoder and several sensors for a high accuracy and realibility. The paramters can be read about the second UART interface (Dynamixel.read[...];) and be send to the RPi with the first one (Serial.print([...]); A example which should show you how easy it is to use the lib and read datas was published below.
#include DynamixelSerial1.h
int Temperature,Voltage,Position;
void setup(){
Serial.begin(9600); // Begin Serial Comunication
Dynamixel.begin(1000000,0); // Inicialize the servo at 1Mbps (Standard) and Pin Control 0
delay(1000);
}
void loop(){
Temperature = Dynamixel.readTemperature(1); // Request and Print the Temperature
Voltage = Dynamixel.readVoltage(1); // Request and Print the Voltage
Position = Dynamixel.readPosition(1); // Request and Print the Position
Serial.print(" *** Temperature: "); // Print the variables in the Serial Monitor
Serial.print(Temperature);
Serial.print(" Celcius Voltage: ");
Serial.print(Voltage);
Serial.print(" Volts Position: ");
Serial.print(Position);
Serial.println(" of 1023 resolution");
delay(1000);
}
Controlling Dynamixel Servomotors
In comparison to reading, controlling Dynamixel Servomotors is much easier. At the beginning of the code you have to define the lib, the motor ID and baudrate, as shown in the example above. After that you are able to control the motor.
void loop(){
Dynamixel.move(1,random(200,800)); // Move Servomotor with ID 1 radomly from 200 to 800
Dynamixel.setEndless(1,ON); //Endless rotation
Dynamixel.turn(1,RIGTH,1000);
Dynamixel.ledStatus(1,ON); //Define status LED
Dynamixel.moveRW(1,512);
delay(1000);
}
The complete example can be visited after adding the Board and libraries to your Arduino IDE. A description of doing this can be read above.
Usage with ROS

When we've started developing the Dynamixel Servo Controllerboard we would like to use it with ROS, too. So we've decided to use a Atmega644P which has two UART interfaces. The first one for communicate with the RPi and the second one for controlling the Dynamixel servomotors.
In the examples above the datas were send via Serial.print commands. In ROS you have to use publisher and subscriber for interacting, so the code has to be changed a little bit.
Adjusting Raspberry Pi voltage
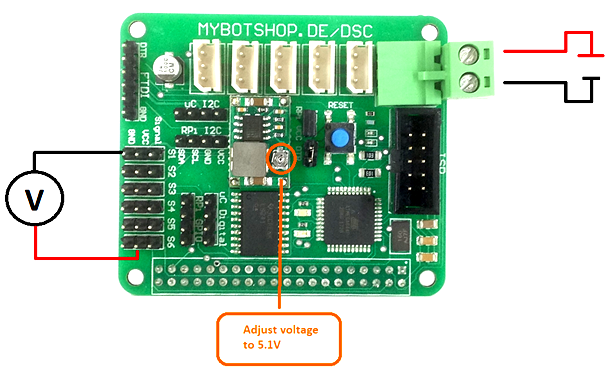
Concerning vibrations during the shipping the preconfigured voltage could be changed. To adjust the voltage is very easy, just plug in a power supply, add a voltmeter and turn the potentiometer slowly. DURING ADJUSTMENT DON'T LEAVE THE DSC PLUGGED ON THE RASPBERRY PI!
In case of high performance processes maybe you have to add a heat sink or a small fan to reduce the temperature of the step down module.
Installation of ROS/Linux packages
The Dynamixel Servo Controllerboard (DSC) was developed as expansion hat for the Raspberry Pi, so we recommend the usage of Ubuntu Mate. A complete configured a ROS preinstalled RPi Image can be downloaded HERE In addition to that we need to install the following packages to be able to communicate with the DSC over UART interface.
sudo apt-get install arduino arduino core
sudo apt-get install ros-kinetic-rosserial
sudo apt-get install ros-kinetic-rosserial-arduino
After restarting the Raspberry Pi we are able to communicate with the DSC. For reading datas please execute the following commands in seperate terminal.
roscore
rosrun rosserial_python serial_node.py /dev/ttyAMA0
rostopic pub servo std_msgs/UInt16
Configuration the Arduino IDE
For a easy use of Arduino and ROS you can download the ROS.h lib which has implemented the publisher and subscriber.
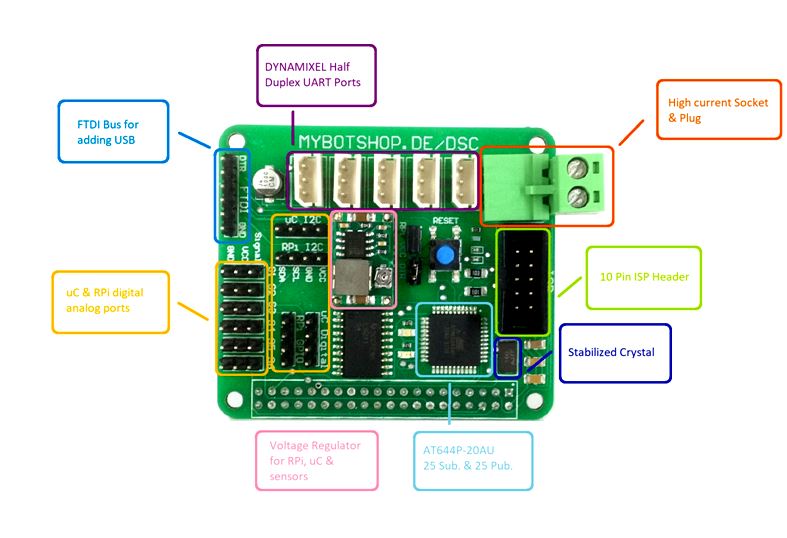
Circuit Diagram & Boardlayout
Board Layout
Hazard warning & Disclaimer
ATTENTION! Wrong wiring and usage can damage the Dynamixel Servo Controllerboard (DSC) and every attachted device.
HINT! Please check the wiring before connecting a supply voltage.
DANGER! This Controllerboard was developed for research only, so please don't use it for industrial or safety relevant functions.
If you have any questions or suggestions, please feel free to contact us every time.
WEEE Compliance Statement (ElektroG)

MYBOTSHOP is helping keep our enviremont clean, so we are offering our customers free take-back for the Dynamixel Servo Controllerboard (DSC) and many more devices.
For example, if a customer bought a new robot kit or development board from us we would accept their old robot kit and prevent it going into landfill site by disposing of it safely. Customers must return their WEEE item to us within 30 days of purchasing their new item. Customers do not have to pay for the transportation of their WEEE to our premises. The Dynamixel Servo Controllerboard and many more devices, which are distributed from us, can be free take-back every time.
If you wish to return your WEEE item, please contact us by Email: info@mybotshop.de


Thomas S., 31.03.19 18:13
where can I download ros.h? Configuration the Arduino IDE For a easy use of Arduino and ROS you can download the ROS.h lib which has implemented the publisher and subscriber.